Creating Quiz App Using JavaScript – Project Review
Creating a quiz app is a fantastic beginner-friendly project for those who are just starting to explore JavaScript, HTML, and CSS. It provides an excellent opportunity to practice working with forms, handling user input, and performing calculations. In this post, we’ll take a closer look at a simple quiz app built using JavaScript and break down its features and functionality.
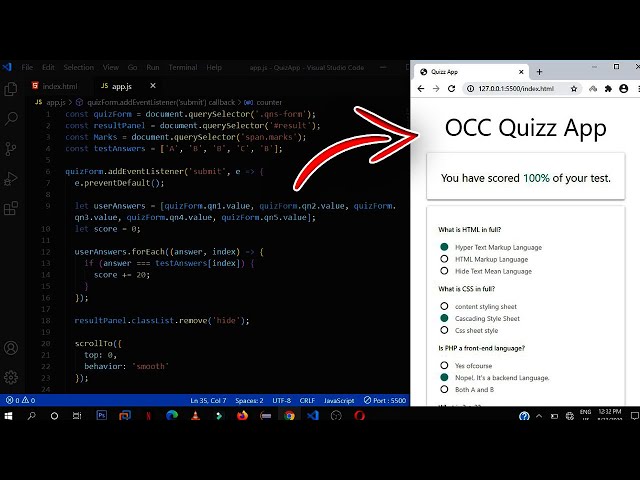
What is the Quiz App?
This project is a basic quiz application that presents the user with multiple-choice questions. Once the user selects answers and submits the form, their score is calculated and displayed as a percentage. It’s an engaging way to learn both front-end development and some JavaScript basics.
Tutorial
Let’s walk through the code and the core features:
HTML Structure: Building the Quiz Interface
<html lang=”en”>
<head>
<meta charset=”UTF-8″>
<meta name=”viewport” content=”width=device-width, initial-scale=1.0″>
<title>Quizz App</title>
<link rel=”stylesheet” href=”materialize.min.css”>
</head>
<body>
<div class=”container”>
<h2 class=”center”>OCC Quizz App</h2>
<div class=”row”>
<div class=”col l3 s12″></div>
<div class=”col l6 s12″>
<div class=”card-panel hide” id=”result”>
<h5 class=”center”>You have scored <span class=”teal-text marks”>0%</span> of your test.</h5>
</div>
<div class=”card-panel”>
<form class=”qns-form”>
<div class=”question”>
<p>What is HTML in full?</p>
<div class=”answer”>
<label>
<input type=”radio” name=”qn1″ value=”A”>
<span>Hyper Text Markup Language</span>
</label>
</div>
<div class=”answer”>
<label>
<input type=”radio” name=”qn1″ value=”B”>
<span>HTML Markup Language</span>
</label>
</div>
<div class=”answer”>
<label>
<input type=”radio” name=”qn1″ value=”C”>
<span>Hide Text Mean Language</span>
</label>
</div>
</div>
<div class=”question”>
<p>What is CSS in full?</p>
<div class=”answer”>
<label>
<input type=”radio” name=”qn2″ value=”A”>
<span>content styling sheet</span>
</label>
</div>
<div class=”answer”>
<label>
<input type=”radio” name=”qn2″ value=”B”>
<span>Cascading Style Sheet</span>
</label>
</div>
<div class=”answer”>
<label>
<input type=”radio” name=”qn2″ value=”C”>
<span>Css sheet style</span>
</label>
</div>
</div>
<div class=”question”>
<p>Is PHP a front-end language? </p>
<div class=”answer”>
<label>
<input type=”radio” name=”qn3″ value=”A”>
<span>Yes ofcourse</span>
</label>
</div>
<div class=”answer”>
<label>
<input type=”radio” name=”qn3″ value=”B”>
<span>Nope!, It’s a backend Language.</span>
</label>
</div>
<div class=”answer”>
<label>
<input type=”radio” name=”qn3″ value=”C”>
<span>Both A and B</span>
</label>
</div>
</div>
<div class=”question”>
<p>What is 2 + 2?</p>
<div class=”answer”>
<label>
<input type=”radio” name=”qn4″ value=”A”>
<span>The answer is: 22</span>
</label>
</div>
<div class=”answer”>
<label>
<input type=”radio” name=”qn4″ value=”B”>
<span>The answer is: 2.2</span>
</label>
</div>
<div class=”answer”>
<label>
<input type=”radio” name=”qn4″ value=”C”>
<span>The answer is: 4</span>
</label>
</div>
</div>
<div class=”question”>
<p>What is the hexdecimal color code of black?</p>
<div class=”answer”>
<label>
<input type=”radio” name=”qn5″ value=”A”>
<span>#fff;</span>
</label>
</div>
<div class=”answer”>
<label>
<input type=”radio” name=”qn5″ value=”B”>
<span>#000;</span>
</label>
</div>
<div class=”answer”>
<label>
<input type=”radio” name=”qn5″ value=”C”>
<span>#f00;</span>
</label>
</div>
</div>
<button class=”btn right”>Submit answer</button>
</form>
<div class=”clearfix”></div>
</div>
</div>
<div class=”col l3 s12″></div>
</div>
</div>
<script src=”app.js”></script>
</body>
</html>
What’s Happening Here?
Structure:
The HTML contains a simple form layout where five questions are displayed. For each question, users have three options, and they must select one of the radio buttons to answer.
Materialize CSS:
We’re using Materialize CSS (a popular framework) to style the page, which includes ready-to-use components like buttons and card panels, enhancing the UI.
Submit Button:
A submit button is placed at the bottom to finalize the user’s answers.
JavaScript: Handling User Input and Calculating the Score
Now, let’s break down the JavaScript part of the project, where the core logic happens.
const quizForm = document.querySelector(‘.qns-form’);
const resultPanel = document.querySelector(‘#result’);
const Marks = document.querySelector(‘span.marks’);
const testAnswers = [‘A’, ‘B’, ‘B’, ‘C’, ‘B’];
quizForm.addEventListener(‘submit’, e => {
e.preventDefault();
let userAnswers = [quizForm.qn1.value, quizForm.qn2.value, quizForm.qn3.value, quizForm.qn4.value, quizForm.qn5.value];
let score = 0;
userAnswers.forEach((answer, index) => {
if (answer === testAnswers[index]) {
score += 20;
}
});
resultPanel.classList.remove(‘hide’);
scrollTo({
top: 0,
behavior: ‘smooth’
});
let output = 0;
const counter = setInterval(() => {
Marks.textContent = `${output}%`;
if (output === score) {
clearInterval(counter);
} else {
output++;
}
}, 10)
quizForm.reset();
});
What’s Happening Here?
- Form Handling:
We’re attaching an event listener to the form submission. When the user submits the form, the default behavior (page reload) is prevented using e.preventDefault(). This ensures that the page doesn’t refresh and lose the user’s answers. - Capturing Answers:
The user’s answers are captured from the form (quizForm.qn1.value, quizForm.qn2.value, etc.). These answers are compared with the correct answers (testAnswers array). - Scoring:
For each correct answer, the score is incremented by 20 (since there are five questions, the score is out of 100). If the user’s answer matches the correct answer in the testAnswers array, 20 points are added to the score. - Smooth Scrolling to Results:
Once the score is calculated, the result panel is made visible using resultPanel.classList.remove(‘hide’). The page smoothly scrolls to the top, where the results will be displayed. - Displaying the Score:
The score is displayed with a smooth animation. We use setInterval to update the score every 10 milliseconds, simulating a progress bar effect. When the score reaches the calculated value, the interval is cleared, and the final score is shown. - Resetting the Form:
After displaying the results, the form is reset using quizForm.reset(), allowing users to take the quiz again if they wish.
Styling with Materialize CSS
To make the quiz app visually appealing, we’ve incorporated Materialize CSS, which provides ready-to-use components that are responsive and look good out of the box.
- Card Panels:
The quiz form and result display are enclosed in Materialize card panels to give a neat and organized look. - Button Styling:
The submit button uses Materialize’s button class (btn) to make it look stylish and intuitive.
Summary of Features
- Five Multiple-Choice Questions: The app contains five questions with radio button answers.
- Score Calculation: After submission, the app calculates the user’s score based on the answers.
- Smooth UI: The result is displayed with smooth scrolling and a counter animation.
- Material Design: The app uses Materialize CSS for a clean and responsive design.
- User-Friendly: Once the user submits the answers, they can instantly see their score and take the quiz again.
Github Repo: Source code
Conclusion
This simple quiz app demonstrates how JavaScript can be used effectively to create an interactive web application. It covers basic concepts like form handling, conditionals, loops, and DOM manipulation. With just a little bit of HTML, CSS, and JavaScript, you can easily extend this project, adding more features like timer countdowns, random questions, or a high score leaderboard.
Whether you’re a beginner or someone looking to brush up on your JavaScript skills, this quiz app is an excellent project to try.
Advertisement